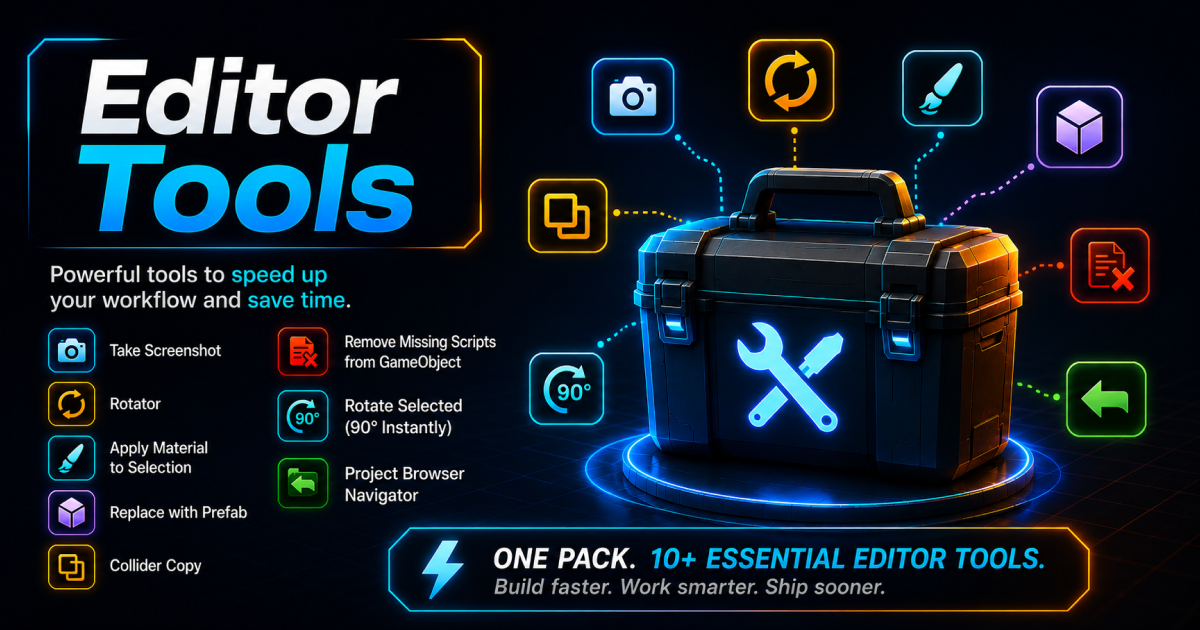
Build faster.
Work smarter.
Ship sooner.
A growing collection of lightweight Unity editor and runtime utilities. Each tool solves one real problem, integrates cleanly into the Editor, and adds zero overhead to your project.
Everything in the package
Sixteen tools, one package. Each one built to cut a repetitive step out of your daily Unity workflow.
Project Browser Navigator Editor
Browser-style back and forward navigation for the Unity Project window.
Working in large projects means constantly drilling into nested asset folders and losing your place. The Project Browser Navigator adds a history stack to the Project window so you can navigate back and forward through folders you have already visited, the same way a web browser or file explorer does.
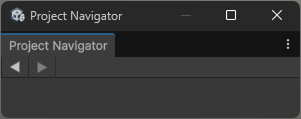
A dockable toolbar window contains the navigation buttons. Dock it into the same tab group as the Project window and it stays there across sessions.
Getting Started
- Open Unity and go to Tools > Editor Tools > Project Navigator > Project Navigator Window.
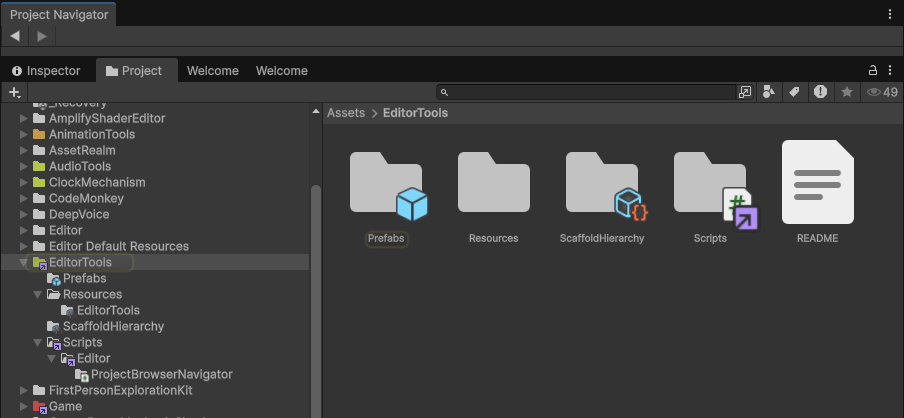
- Drag the floating window into the same tab group as your Project window so they dock together.
- Navigate normally in the Project window. The history fills automatically as you move between folders.
- Click the ◀ or ▶ buttons, or use Alt+[ / Alt+] to go back and forward.
Settings
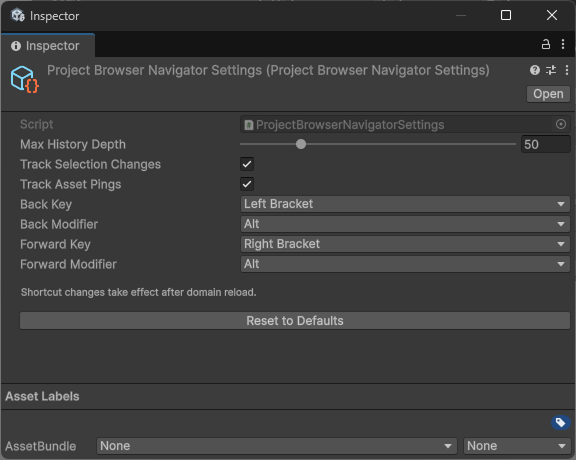
Open the settings asset via Tools > Editor Tools > Project Navigator > Settings. The settings ScriptableObject will be highlighted in the Project window.
| Property | Type | Description |
|---|---|---|
| maxHistoryDepth | int | Maximum number of entries stored in the back stack. Default is 50. |
| trackSelectionChanges | bool | When enabled, selecting individual assets also adds entries to the history. When disabled, only folder navigation is tracked. |
Keyboard Shortcuts
| Shortcut | Action |
|---|---|
| Alt + [ | Navigate back |
| Alt + ] | Navigate forward |
Apply Material to Selection Editor
Apply a material to all Renderers on selected GameObjects in one click.
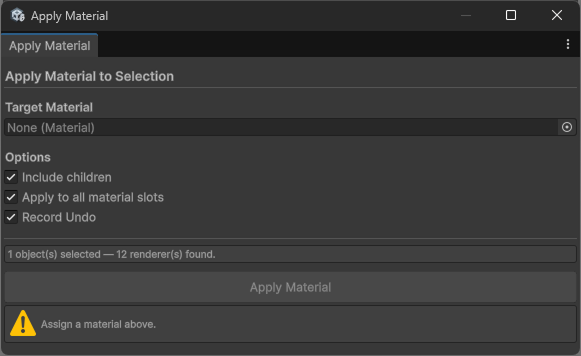
Selecting a group of objects and manually reassigning materials one by one is tedious. This window lets you drag in a target material and apply it across every Renderer on your entire selection in a single operation.
Usage
- Open the window via Tools > Editor Tools > Apply Material to Selection.
- Drag your target material into the Target Material field.
- Select the GameObjects you want to update in the Hierarchy or Scene view.
- Adjust the options as needed, then click Apply Material.
Options
| Option | Default | Description |
|---|---|---|
| Include Children | On | Also processes all child GameObjects of each selected object. |
| Apply to All Material Slots | On | Replaces every element in the sharedMaterials array. Disable to only replace slot 0. |
| Record Undo | On | Registers the operation so it can be reversed with Ctrl+Z / Cmd+Z. |
Rotate Selected Editor
Rotate scene objects by a precise amount using keyboard shortcuts.
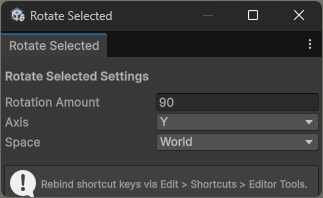
When dressing a scene you often want to snap-rotate objects by an exact amount like 90 degrees. Rotate Selected gives you one-keypress rotation with configurable axis, space, and degrees, without touching the Inspector or manually editing Transform values.
Settings
| Setting | Default | Description |
|---|---|---|
| Rotation Amount | 90 | Degrees to rotate per keypress. |
| Axis | Y | World axis to rotate around. Options: X, Y, Z. |
| Space | World | World rotates around the world axis. Local rotates around the object's own axis. |
Keyboard Shortcuts
| Shortcut | Action |
|---|---|
| G | Rotate selected objects in the positive direction |
| Shift + G | Rotate selected objects in the negative direction |
Replace With Prefab Editor
Swap selected scene objects with a chosen prefab, preserving their transforms.
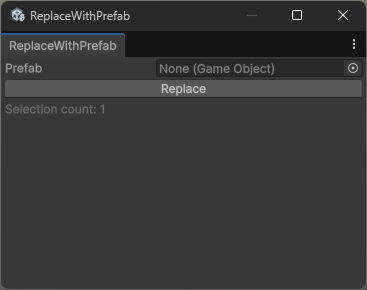
When you need to replace placeholder geometry with final prefabs, or swap out one prop variant for another across a scene, doing it object by object is slow. Replace With Prefab lets you select multiple objects, choose a target prefab, and replace them all in one click. Each new instance inherits the original object's position, rotation, scale, parent, and sibling index.
Usage
- Open the window via Tools > Editor Tools > Replace With Prefab.
- Drag your target prefab into the Prefab field.
- Select the GameObjects you want to replace in the Hierarchy.
- Click Replace. The selection count at the bottom of the window confirms how many objects will be replaced.
Copy Collider to Root Editor
Moves a CapsuleCollider from a child object to the prefab root in one click.
When importing character rigs, the physics collider often lands on a child bone rather than the root GameObject. This makes it awkward to reference at runtime and can break character controller setups that expect the collider on the root. Copy Collider to Root fixes this in one menu click by copying the CapsuleCollider component, all of its properties, up to the root and removing it from the child.
Usage
- Select the root GameObject of your character prefab in the Hierarchy or Project window.
- Go to Tools > Editor Tools > Copy Collider to Root.
- The CapsuleCollider is moved to the root and the prefab is saved automatically.
Remove Missing Scripts Editor
Find and remove null MonoBehaviour references from GameObjects and prefabs.
Deleted or renamed scripts leave behind null MonoBehaviour entries on GameObjects, which show as "Missing Script" in the Inspector. These cause console warnings and can break serialization. This tool finds and removes them, either from your current selection or from every prefab in the project at once.
Menu Locations
| Menu Path | Scope |
|---|---|
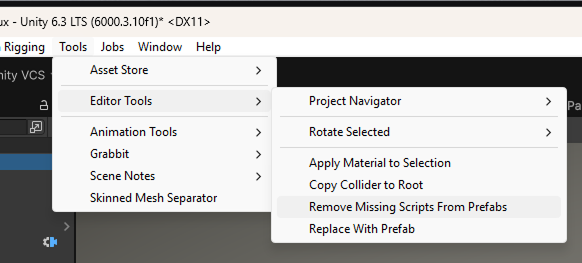
| GameObject / Editor Tools / Remove Missing Scripts | Selected GameObjects and all their children |
| Assets / Editor Tools / Remove Missing Scripts | Selected prefab assets in the Project window |
| Tools / Editor Tools / Remove Missing Scripts From Prefabs | Every prefab in the entire project |
Take Screenshot Runtime
Capture game screenshots at runtime via a configurable keypress.
Add TakeScreenshot to any GameObject in your scene to get instant screenshot capture during playtesting or in shipped builds. Screenshots are saved to a /Screenshots/ folder at the project root in the Editor, and to Application.persistentDataPath/Screenshots/ in builds. Filenames auto-increment so you never overwrite a previous capture.
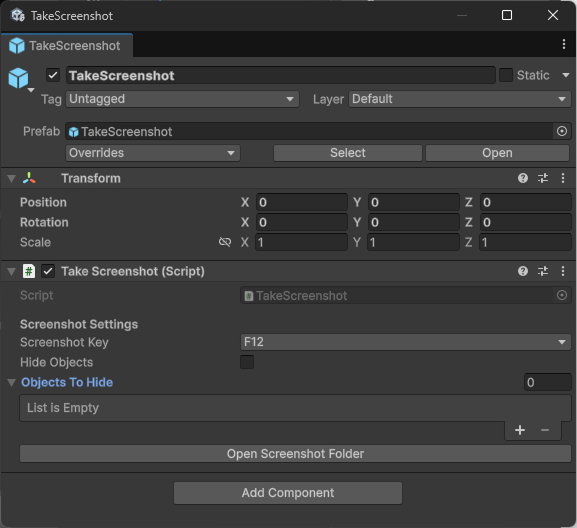
Setup
- Add the TakeScreenshot component to any GameObject in your scene.
- Set your preferred Screenshot Key (default: F12).
- Optionally assign GameObjects to Objects to Hide to temporarily disable UI or debug overlays before capture.
- Press play and use your assigned key to capture. Click Open Screenshot Folder in the Inspector to browse output files.
Inspector Properties
| Property | Type | Description |
|---|---|---|
| screenshotKey | KeyCode | The key that triggers a capture. Default is F12. |
| hideObjects | bool | When enabled, the objects listed below are hidden before capture and restored afterwards. |
| objectsToHide | GameObject[] | List of GameObjects to temporarily deactivate during capture. Useful for hiding HUD or debug overlays. |
Floating Motion Runtime
Organic randomised bobbing and rotation oscillation for any GameObject.
Floating Motion adds a sinusoidal bob and rotation wobble to a GameObject that feels natural and varied. Each axis gets a random phase offset on Start, so multiple objects in the same scene never move in sync. Useful for pickups, ambient props, floating UI elements, and decorative scene dressing.
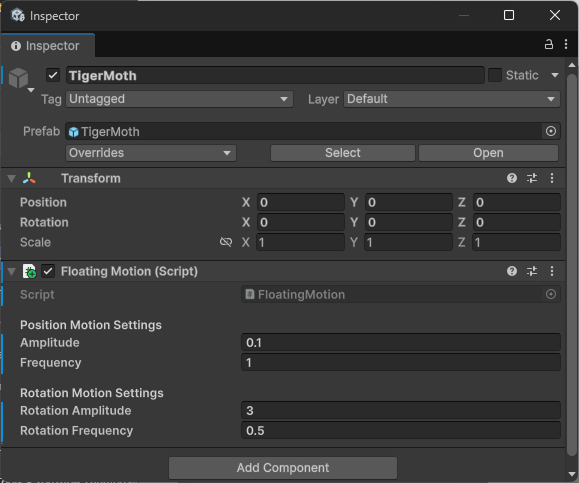
Inspector Properties
| Property | Type | Description |
|---|---|---|
| amplitude | float | Maximum distance the object moves from its start position on each axis. Default is 0.1. |
| frequency | float | Speed of the positional oscillation. Default is 1. |
| rotationAmplitude | float | Maximum degrees of rotation from the start rotation. Default is 1. |
| rotationFrequency | float | Speed of the rotation wobble. Default is 0.5. |
Rotator Runtime
Simple continuous or single-cycle rotation with AnimationCurve easing support.
Rotator handles the common need for a continuously spinning or single-pass rotating object, from radar dishes to fan blades to loading spinners. You can drive it at constant speed or use an AnimationCurve to create a spin that starts fast and eases to a stop, spins up slowly, or any custom timing you define.
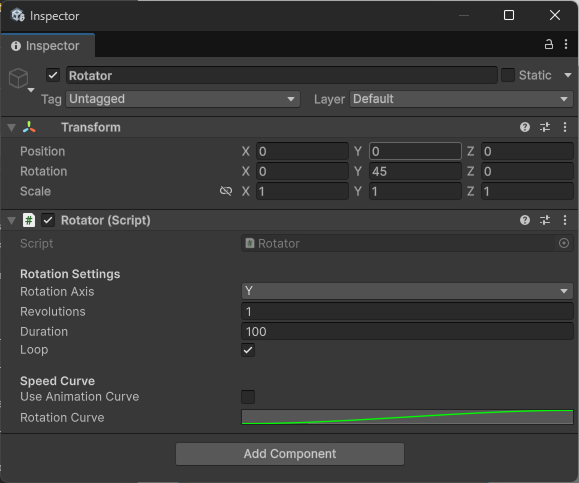
Inspector Properties
| Property | Type | Description |
|---|---|---|
| rotationAxis | Axis (X/Y/Z) | The axis to rotate around. |
| revolutions | float | Number of complete 360 degree rotations per cycle. Default is 1. |
| duration | float | Duration of one full rotation cycle in seconds. Default is 1. |
| loop | bool | When enabled the rotation repeats continuously. When disabled it stops after one cycle and disables the component. |
| useAnimationCurve | bool | When enabled the rotation speed follows the curve below instead of running at constant speed. |
| rotationCurve | AnimationCurve | X axis is normalised time (0 to 1 over duration). Y axis is rotation progress (0 to 1 over total revolutions). |
Public API
| Method | Description |
|---|---|
| Restart() | Resets elapsed time to zero, re-anchors the start rotation to the current rotation, and re-enables the component. |
Cinemachine Spline Dolly Mover Runtime Requires Cinemachine
Drives a CinemachineSplineDolly along its spline over time.
CinemachineSplineDollyMover automates camera movement along a Cinemachine spline path. Attach it to the same GameObject as your CinemachineSplineDolly and it will animate the camera position from 0 to 1 along the spline over a set duration. Supports ping-pong for back-and-forth motion, configurable easing via an AnimationCurve, and a public API for triggering playback from code or UnityEvents.
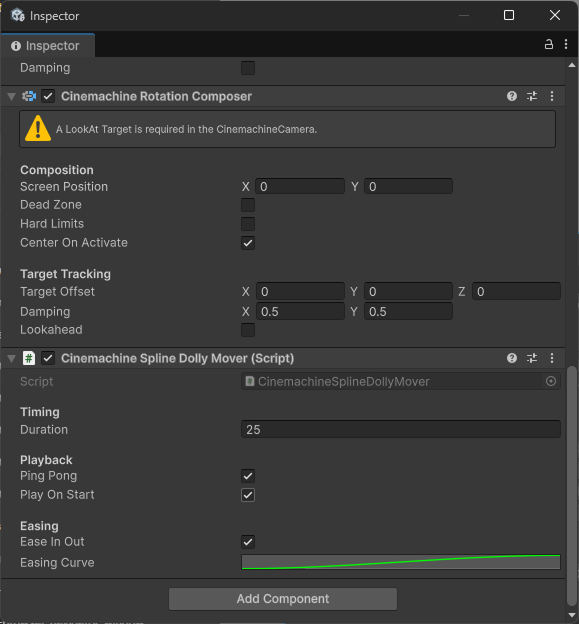
Setup
- Ensure the Cinemachine package is installed via Window > Package Manager.
- Create a Cinemachine Camera with a SplineDolly component and a Spline Container path.
- Add the CinemachineSplineDollyMover component to the same GameObject.
- Configure duration, ping-pong, and easing, then press Play.
Inspector Properties
| Property | Type | Description |
|---|---|---|
| duration | float | Time in seconds to move from position 0 to position 1 along the spline. Default is 5. |
| pingPong | bool | When enabled the camera reverses direction when it reaches the end and travels back to the start. |
| playOnStart | bool | Automatically begins playback when the scene starts. Default is true. |
| easeInOut | bool | Applies the easing curve below to smooth the start and end of the movement. Default is true. |
| easingCurve | AnimationCurve | Custom curve controlling how position progresses over time. Only used when Ease In Out is enabled. |
Public API
| Method | Description |
|---|---|
| Play() | Starts or resumes playback from the current position. |
| Stop() | Pauses playback at the current position. |
| Restart() | Resets position to 0 and begins playback from the start of the spline. |
Replace Hierarchy With Prefabs Editor
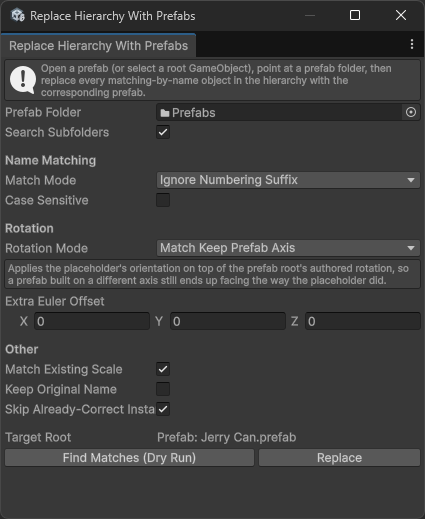
Batch-replace objects in a prefab hierarchy by matching names against a folder of prefabs.
The single-object Replace With Prefab tool is great for small tasks. This is its batch sibling for when you need to dress an entire prefab at once. Point it at a folder of prefabs, open your target prefab in Prefab Mode (or select a root GameObject in a scene), and it walks the hierarchy replacing every object whose name matches a prefab in the folder. Use the dry-run preview to check what will change before committing.
Usage
- Open a prefab in Prefab Mode, or select a root GameObject in the scene.
- Open the window via Tools > Editor Tools > Replace Hierarchy With Prefabs.
- Assign the Prefab Folder containing your replacement prefabs.
- Configure name matching, rotation mode, and other options.
- Click Find Matches (Dry Run) to preview what would be replaced, then click Replace to commit.
Name Match Modes
| Mode | Description |
|---|---|
| Exact | The GameObject name must exactly match the prefab file name. |
| Ignore Numbering Suffix | Strips trailing " (Clone)" or " (12)" suffixes before comparing. Default and most useful for typical workflows. |
| Prefab Name is Prefix | Matches if the GameObject name starts with the prefab name. |
| Contains | Matches if the GameObject name contains the prefab name anywhere. |
Rotation Modes
| Mode | Description |
|---|---|
| Keep Prefab Default | Ignores the placeholder's rotation entirely and uses the prefab's authored root rotation. |
| Match Overwrite | Copies the placeholder's localRotation verbatim onto the new instance. |
| Match, Keep Prefab Axis | Composes the placeholder's orientation on top of the prefab's authored root rotation. Use this when your FBX imports carry an axis-correction rotation on the root. Default. |
Other Options
| Option | Default | Description |
|---|---|---|
| Search Subfolders | On | Includes prefabs in subdirectories of the assigned folder. |
| Case Sensitive | Off | When disabled, name matching ignores case. |
| Extra Euler Offset | 0,0,0 | Additional rotation applied after the rotation mode calculation. Useful for correcting a known axis offset. |
| Match Existing Scale | On | Copies the placeholder's localScale onto the new instance. |
| Keep Original Name | Off | Names the new instance after the placeholder rather than the prefab. |
| Skip Already-Correct Instances | On | Skips objects that are already an instance of the target prefab. |
FBX Mesh Collider Builder Editor
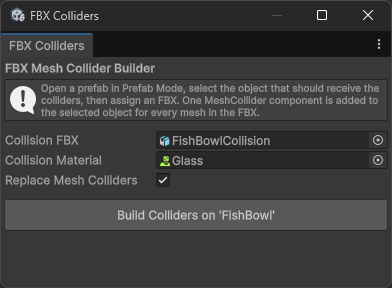
Build a complete collision shell from a dedicated FBX in one click.
For complex props and environments it is common to author a separate low-poly collision mesh in your 3D application and export it as its own FBX. This tool takes that collision FBX, extracts every mesh inside it, and adds one MeshCollider component to the selected prefab object for each mesh. The result is a multi-collider physics shell built from your custom geometry in a single operation.
Usage
- Open the target prefab in Prefab Mode by double-clicking it in the Project window.
- Select the GameObject within the prefab that should receive the collider components.
- Open the window via Tools > Editor Tools > FBX Mesh Collider Builder.
- Assign your Collision FBX asset and optionally a Physics Material.
- Click Build Colliders. The colliders are added and the prefab is marked dirty.
Window Options
| Option | Description |
|---|---|
| Collision FBX | The FBX model asset whose meshes will become MeshCollider components. Must be an .fbx file with at least one mesh. |
| Collision Material | An optional PhysicsMaterial assigned to every generated MeshCollider. |
| Replace Mesh Colliders | When enabled, any existing MeshCollider components on the target object are removed before the new ones are added. Default is on. |
Strip Prefabs to Mesh Editor
Reduce selected prefab instances to bare mesh GameObjects in one menu click.
When you need a scene object to be a plain static mesh with no prefab overhead, scripts, or extra components, this tool does the reduction automatically. Select one or more prefab instances in the scene, run the tool, and each one is unpacked, stripped to just its mesh child (with Transform, MeshFilter, and MeshRenderer preserved), and promoted into the original object's place in the hierarchy at the same position, rotation, and scale.
The tool picks the mesh to keep intelligently: it first looks for a child whose name matches the prefab (e.g. the "Chair" child of a "Chair" prefab), falls back to the root if it has a MeshFilter, and falls back again to the single mesh in the hierarchy if there is only one. It refuses to guess when multiple meshes exist with no name match, and logs a warning instead.
Usage
- Select one or more prefab instances in the scene Hierarchy.
- Go to Tools > Editor Tools > Strip Prefabs To Mesh.
- The selected objects are unpacked and reduced in place. Check the Console for a summary and any warnings about objects that were skipped.
Scaffold Scene Hierarchy Editor
Create a clean named folder structure at the root of your scene in one click.
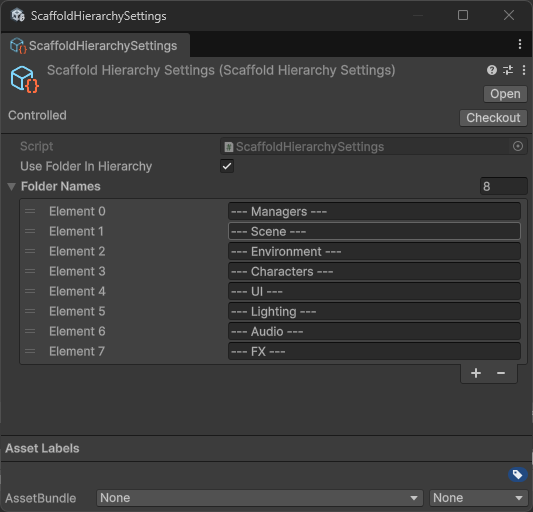
Starting a new scene always involves creating the same set of root separator objects: Managers, Environment, Characters, UI, Lighting, and so on. Scaffold Scene Hierarchy creates your full preferred folder structure in one menu click, skipping any that already exist. The folder names are fully configurable via a ScriptableObject settings asset. If the free "Folder in Hierarchy" asset by TheAAA is installed, the tool creates proper tagged folder objects instead of plain empty GameObjects.
Usage
- Go to Tools > Editor Tools > Scaffold Scene Hierarchy > Tidy Up Hierarchy. The default folder set is created immediately.
- To customise the folder names, go to Tools > Editor Tools > Scaffold Scene Hierarchy > Settings. This creates and selects a ScaffoldHierarchySettings asset in the Inspector.
- Edit the Folder Names list in the settings asset to match your preferred scene structure.
- Run Tidy Up Hierarchy again. Only folders that do not already exist in the scene will be created.
Settings Asset Properties
| Property | Default | Description |
|---|---|---|
| Use Folder in Hierarchy | On | When enabled and the "Folder in Hierarchy" package by TheAAA is installed, creates tagged folder objects instead of plain GameObjects. Uncheck to always use plain GameObjects regardless. |
| Folder Names | See below | The ordered list of folder names to create. Each name becomes one root-level GameObject. Blank entries are skipped. |
Default folder names: --- Managers ---, --- Scene ---, --- Environment ---, --- Characters ---, --- UI ---, --- Lighting ---, --- Audio ---, --- FX ---.
Find Duplicate Event Systems Editor
Scan the scene for all EventSystem components and select them instantly.
Multiple EventSystem components in one scene cause UI input conflicts and console warnings. This is a common problem when merging scenes, importing prefabs, or adding Canvas prefabs that bundle their own EventSystem. This tool finds every EventSystem in the active scene, logs each one with its full hierarchy path, and selects them all in the Hierarchy so you can identify and remove duplicates immediately.
Usage
- Open the scene you want to check.
- Go to Tools > Editor Tools > Find Duplicate Event Systems.
- Check the Console. Each EventSystem found is logged with its full path. All found objects are selected in the Hierarchy.
- Delete any duplicate EventSystems, keeping only one.
Prefab Variant Creator Editor
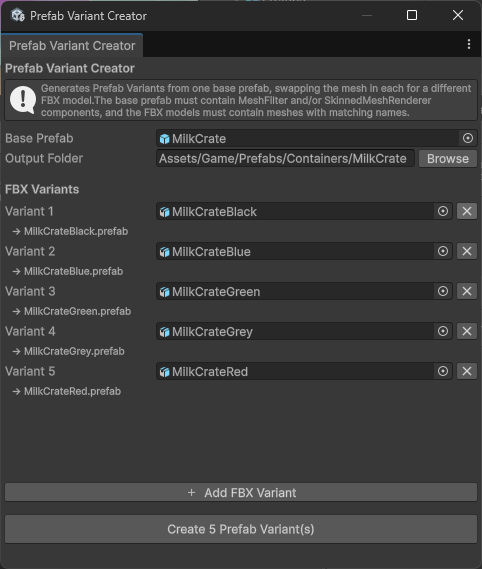
Batch-create Prefab Variants from a base prefab, swapping the mesh in each for a different FBX.
When you have a base prefab with materials, scripts, and colliders already configured and want to create a family of variants using different meshes (e.g. chair variants, prop variants, character body variants), this tool handles the batch creation. Assign the base prefab, add your FBX models, choose an output folder, and it generates one Prefab Variant per FBX. Each variant inherits everything from the base prefab and has its mesh swapped to the corresponding FBX.
Mesh swapping works by matching mesh names: if a MeshFilter or SkinnedMeshRenderer in the base prefab uses a mesh named "Chair_Body", the tool looks for a mesh of the same name inside each FBX. If no exact match is found, it falls back to the first mesh in the FBX.
Usage
- Open the window via Tools > Editor Tools > Prefab Variant Creator.
- Assign your Base Prefab. The output folder defaults to the same folder as the base prefab.
- Optionally click Browse to choose a different output folder.
- Click + Add FBX Variant for each FBX model you want to generate a variant from. The preview label below each slot shows the filename that will be used for the saved prefab.
- Click Create Prefab Variants. A dialog confirms how many variants were created and where they were saved.
More tools from the same publisher
Other assets in the Cerberus Bytes catalogue you might find useful.
Need help or have ideas?
Bug reports, feature requests, and questions are all welcome. New tools are added to this pack over time, so suggestions are especially appreciated.