Overview
When a GameObject is renamed or a hierarchy is restructured, animation clip property bindings store a path string (e.g. Root/Body/Arm/Hand) that no longer resolves to anything in the scene. Unity marks these bindings yellow in the Animation window.
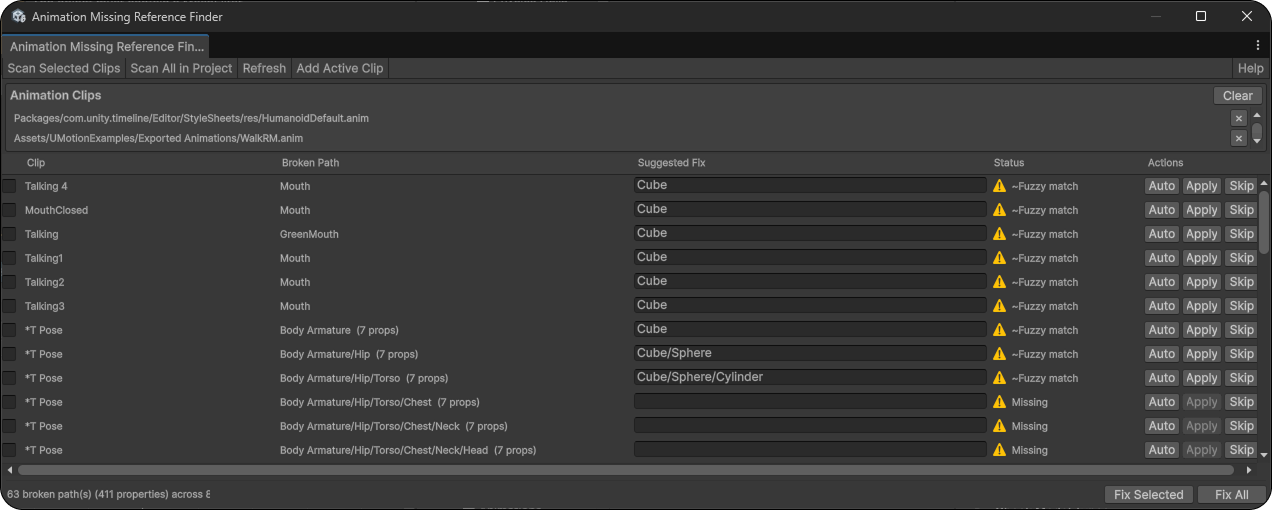
The Animation Missing Reference Finder scans one or more .anim clips, lists every broken path in a table, and lets you repair them — either by typing the correct path, or by letting the tool search the active scene hierarchy and suggest a fix automatically.
Opening the Tool
Tools → Animation Tools → Animation Missing Reference Finder
The window opens as a standalone panel (minimum 700 × 450 px) and can be resized or docked like any other Unity Editor window.
Loading Clips
There are four ways to get clips into the tool:
- Scan Selected Clips — select one or more .anim files in the Project window, then click this button. The clips are added to the list and scanned immediately.
- Scan All in Project — finds every AnimationClip asset in the project. A progress bar tracks the scan. All previously loaded clips and results are cleared first.
- Add Active Clip — reads whichever clip is currently open in Unity's Animation window and adds it to the list. Useful when you are already looking at a clip with yellow bindings.
- Drag and Drop — drag .anim files from the Project window directly onto the Clip Source Area at the top of the window. Non-clip assets are rejected.
Click Refresh to re-scan the loaded clip list after making hierarchy changes without clearing it. Click Clear to remove all clips and results.
Reading the Results Table
After scanning, the results table shows one row per broken path. Multiple animated properties that share the same broken path (e.g. localPosition.x/y/z) are grouped into a single row — a property count badge shows how many properties will be repaired when you fix that row.
Resolved
Auto-resolve found a confident exact-name match. Safe to apply.
~Fuzzy match
Auto-resolve found a close match with a slightly different name — review the suggested path before applying.
Fixed
The fix has been written to the clip successfully.
Skipped
Excluded from Fix All. Can still be applied individually.
Locked
Clip asset is read-only. Edit buttons are disabled for this row.
Auto-Resolve
Auto-resolve runs automatically on every row after each scan. It can also be triggered per-row using the Auto button.
The tool walks down the broken path segment by segment, matching each segment to the children of the previous match in the active scene hierarchy. Candidates are ranked by name similarity — exact matches are tried first, then close matches scored by similarity. A candidate is only accepted if the entire remaining path can also be resolved beneath it, so a near-match at one level that leads to a dead end is rejected and the next candidate is tried.
💡 Tip
Auto-resolve requires an active scene to be open. If no scene is loaded, auto-resolve is disabled and the footer displays a warning. If auto-resolve could not find a match — for example, the target object doesn't exist in the currently open scene — you can type the correct path directly into the Suggested Fix field and press Apply.
Applying Fixes
- Apply (per-row) — writes the Suggested Fix field for that single row to the clip immediately. Supports Undo.
- Fix Selected — applies fixes to all checked rows that have a suggested path and are not Skipped or already Fixed. Wrapped in a single Undo group.
- Fix All — applies fixes to every eligible row in the table. Wrapped in a single Undo group. Assets are saved automatically after the batch.
⚠ Important
The property count badge (e.g. (6 props)) tells you how many animated properties are being repaired by a single row fix. You do not need to handle each property individually — fixing the path fixes them all.